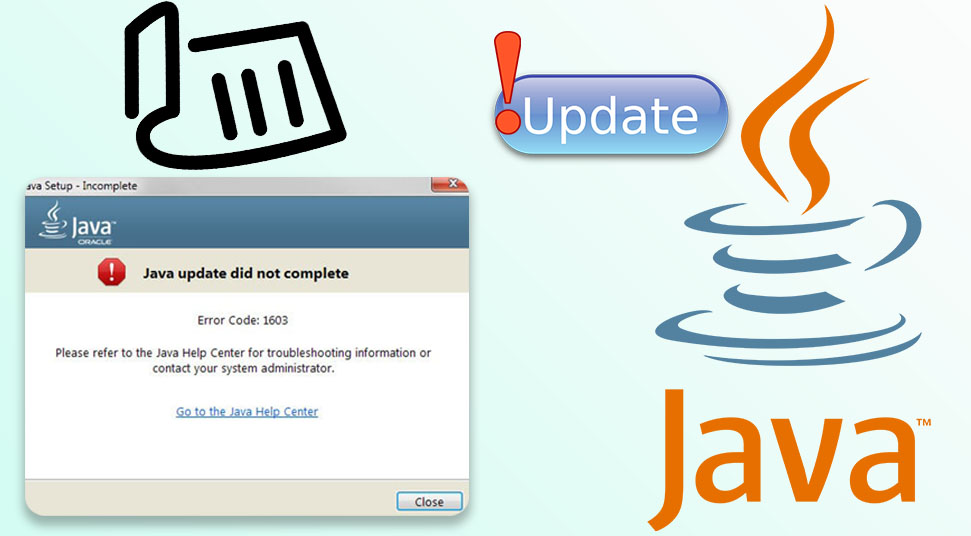
Java error code 1603 is one of the most common technical glitches that’s encountered by users while trying to install updates for the Java applications on their system.
This error is mainly caused when you try to update a Java application and another Java application is running in the background. Sometimes, this error code appears if any third-party security software is installed on the system.
An older version of the Operating System can also cause this error. If the Java content feature has stopped working, then also you might get this error message on the device.
If you are also dealing with this error, then this article will benefit you. Here in this guide, we are going to tell you in details regarding this error and its possible solutions. Go through this article carefully to know some easy fixes to resolve this issue in no time.
Reliable Procedures to Solve Java Error Code 1603
Before beginning with any solutions, what you need to try is a reboot of the device. Rebooting the system can fix various problems including this one.
After rebooting the system, if the error still appears, then you should try out other procedures. We are going to discuss some of the troubleshooting procedures that can help you to get rid of the Java error code 1603 on your computer. So, take a look at the section below.
Procedure 1 – Disable the Windows Firewall Feature
Sometimes, this error code comes up if the Windows Firewall feature is turned on. This feature can prevent the Java application from installing.
So, you have to disable the Firewall on the system. To do that, follow these instructions:
- At first, press the Windows Home button and X key together to launch the WinX menu list and then select Control Panel.
- When the Control Panel window opens, click on the Windows Firewall section.
- In the windows Firewall window, click on the Turn Windows Firewall On and Off button from the left panel.
- From the right, go to the Private Network Settings and Public Network Settings section and then click on the Turn Off Windows Firewall button to disable the firewall for both the networks. After doing this, select the OK button to save the changes.
Once you are done with these steps, reboot the system and then try to install the Java application on the system.
Procedure 2 – Remove the Security Software
After disabling the Windows Firewall feature, if the error code still shows up, then you need to uninstall the security software from the system. Follow these directions:
- Press the Windows key along with the I key to launch the Settings window.
- From the Settings window, locate the Apps section, select it. After that, select the Apps and Features tab on the left panel.
- In the Apps and Features window, scroll down the page and find the Security software, click on it. Then select the Uninstall button to remove it.
- Once the process is complete, reboot your computer and then check if the error code still appears or not.
Procedure 3 – Remove Previous Versions of Java Application
The Java installer error code 1603 can be generated by a previously installed version of a Java application. So, you need to remove the previous version of the Java application.
The following steps will help you:
- On the keyboard, hold the Windows button and press the R key to launch the Run window. Type appwiz.cpl and then click on the OK button or press the Enter button.
- When the Programs and Features window opens, find the Java application and select it. After that, you will get an option Uninstall, click on it to remove the application.
- Once it is removed, reboot your PC and then check if the error is resolved or not.
Procedure 4 – Re-enable Java Content
Re-enabling the Java content can help you get rid of the Java error code 1603 on your computer. Therefore, follow the guidance which is mentioned below to modify the setting.
- Press the Windows Home key and along with the R button to launch the Run window.
- Type Control Panel and then hit the Enter button or click the OK option.
- From the Control Panel window, select the Programs button. In the next window, you will find Java, click on it.
- From the Java window, go to the Security tab and unmark the ‘Enable Java content in the browser’ option and then select the Apply button.
- After that, mark on the ‘Enable Java content in the browser’ option and then click on the Apply button to save the changes.
Once you are done with these steps, reboot your computer and then try to install the Java application.
Procedure 5 – Install the Operating System
When you try to install the Java application, at first, you need to check if the Operating System is updated or not.
Sometimes, the version of the Java application does not match with the Operating System and as a result, you may encounter the Java error code 1603 on your PC.
So, you need to update the system in order to fix this issue. To perform this, follow the steps cited hereunder:
- Open the Settings window, by pressing the Windows Home key and I button together.
- Double-click on the Update and Security tab from the Settings window.
- In the Update and Security window, navigate to the Update tab on the left panel.
- On the right, find the Check for Updates button, click on it to find whether any updates are available or not. If yes, then you will get an option Update, click on it.
Once the update process is complete, reboot your PC and then check if the Java application installs properly without any error.
Procedure 6 – Install the Java Application as Administrator
Sometimes, installing the Java application as an administrator can fix this problem on the system. So, try to install the Java application as an administrator. Follow these directions:
- Locate the Java Installer, right-click on it to launch the list.
- From that list, choose the Run as administrator button to open the setup wizard. Then follow the instructions which pop-ups on the screen to install the application.
Procedure 7 – Close the Application
If none of the above procedures helped you in fixing this issue, you can use this procedure on the system to eliminate the Java installer problem.
You should try to close the application that the error code has displayed. The directions below will help you:
- From the keyboard, hold and press the CTRL + SHIFT + ESC buttons at the same time to launch the Task Manager window.
- When the Task Manager window opens, go to the Process tab and find the application, select it.
- Then click on the End Task button to stop the process. After doing this, restart the system.
Procedure 8 – Run the System File Checker Tool
Running the System File Checker tool (SFC) can also fix this error on your computer. To do this, follow the steps mentioned below:
- Right-click on the Windows Icon to launch the WinX menu list and select the Command Prompt(Admin).
- When the Command Prompt window opens, enter SFC/scannow command and then hit the Enter button.
Once the scanning process is complete, try to install the Java application on your PC and check if the error code shows up or not.
Wrapping Up
Hope, this article helped you to fix the Java error code 1603 on the system. Follow these procedures one-by-one on your computer to solve this error.
After performing these steps, if the error code still appears, then you can drop a message in the comment section below. We will get back to you with the proper fix according to the issue you are facing. Or, you can also get in touch a professional to resolve this particular error code.